

A refrigerator that smells off can make an entire kitchen feel less clean, even when every other surface is spotless. Odors usually come from spilled food, expired leftovers, or spoiled produce that got pushed to the back and forgotten, and once that smell sets into the plastic interior, it tends to linger even after the source is removed. Removing refrigerator odor is a common task, but doing it well takes more than a quick wipe-down; it means finding the actual source, cleaning the surfaces the smell has settled into, and using something to absorb what's left behind. This guide is part of the Refrigerator Cleaning Guide, and it walks through how to track down the cause, clean it properly, and keep odors from coming back.
How Do You Remove Refrigerator Odors?
Start by removing all food and checking for the source, usually a forgotten spill, a leaking container, or spoiled produce. Wash the interior shelves, drawers, and walls with warm water and a small amount of baking soda dissolved in it, then rinse with a clean, damp cloth and dry thoroughly. Once the fridge is clean and dry, place an open box of baking soda, or a bowl of activated charcoal, on a shelf to absorb any lingering smell over the following days. If the odor persists after a full clean, check the drip pan, door seals, and any drawer liners, since odor can hide in spots that aren't part of the main interior wipe-down.
The sections below go deeper into finding the source, the actual cleaning steps, and what to use for lingering smells that don't resolve with a single clean.
Finding the Source Before You Clean
Cleaning without finding the source usually means the smell comes back within a few days. Before reaching for any product, take a few minutes to check the most common culprits.
- Spoiled produce or forgotten leftovers, especially items pushed to the back of a shelf or drawer where they're easy to overlook
- A spill that leaked under a shelf or into a drawer track, which can sit unnoticed since it's not visible during a quick glance
- A container with a loose lid, allowing food odor to escape gradually rather than staying sealed in
- The drip pan, a shallow tray usually located underneath or behind the refrigerator that collects condensation and can develop odor if it sits unchecked for a long stretch
- Door seals and gaskets, where crumbs and residue can collect in the folds and hold onto smell even after the main interior is cleaned
Going through each of these before starting a full clean saves time and helps confirm whether the issue is a single spoiled item or something that's built up more gradually across several spots.
Step-by-Step Odor Removal Process
- Remove all food from the refrigerator, checking expiration dates and tossing anything spoiled, forgotten, or unclear. This is also the point to check for any hidden spills underneath containers.
- Take out removable shelves and drawers and wash them separately in warm water with a small amount of mild dish soap or dissolved baking soda. Rinse thoroughly and let them air dry.
- Wipe down the interior walls, ceiling, and floor of the refrigerator with a cloth dampened in a baking soda and water solution (roughly two tablespoons of baking soda per quart of warm water). This mild solution cleans effectively without leaving a strong chemical smell behind.
- Pay close attention to corners, drawer tracks, and any grooves where spills tend to settle and dry unnoticed.
- Rinse with a clean, damp cloth to remove the baking soda residue, then dry the interior thoroughly with a dry towel.
- Check the door seals, wiping into the folds with a cloth or a soft toothbrush to remove any trapped crumbs or residue.
- Let the refrigerator air out for 15 to 20 minutes with the door open before placing food back in, which helps any remaining dampness evaporate.
- Place an open box of baking soda, or a small bowl of activated charcoal, on a shelf to absorb any lingering odor over the following days.
This full process typically takes 30 to 45 minutes, depending on how much needs to come out and how deep the odor has settled in.
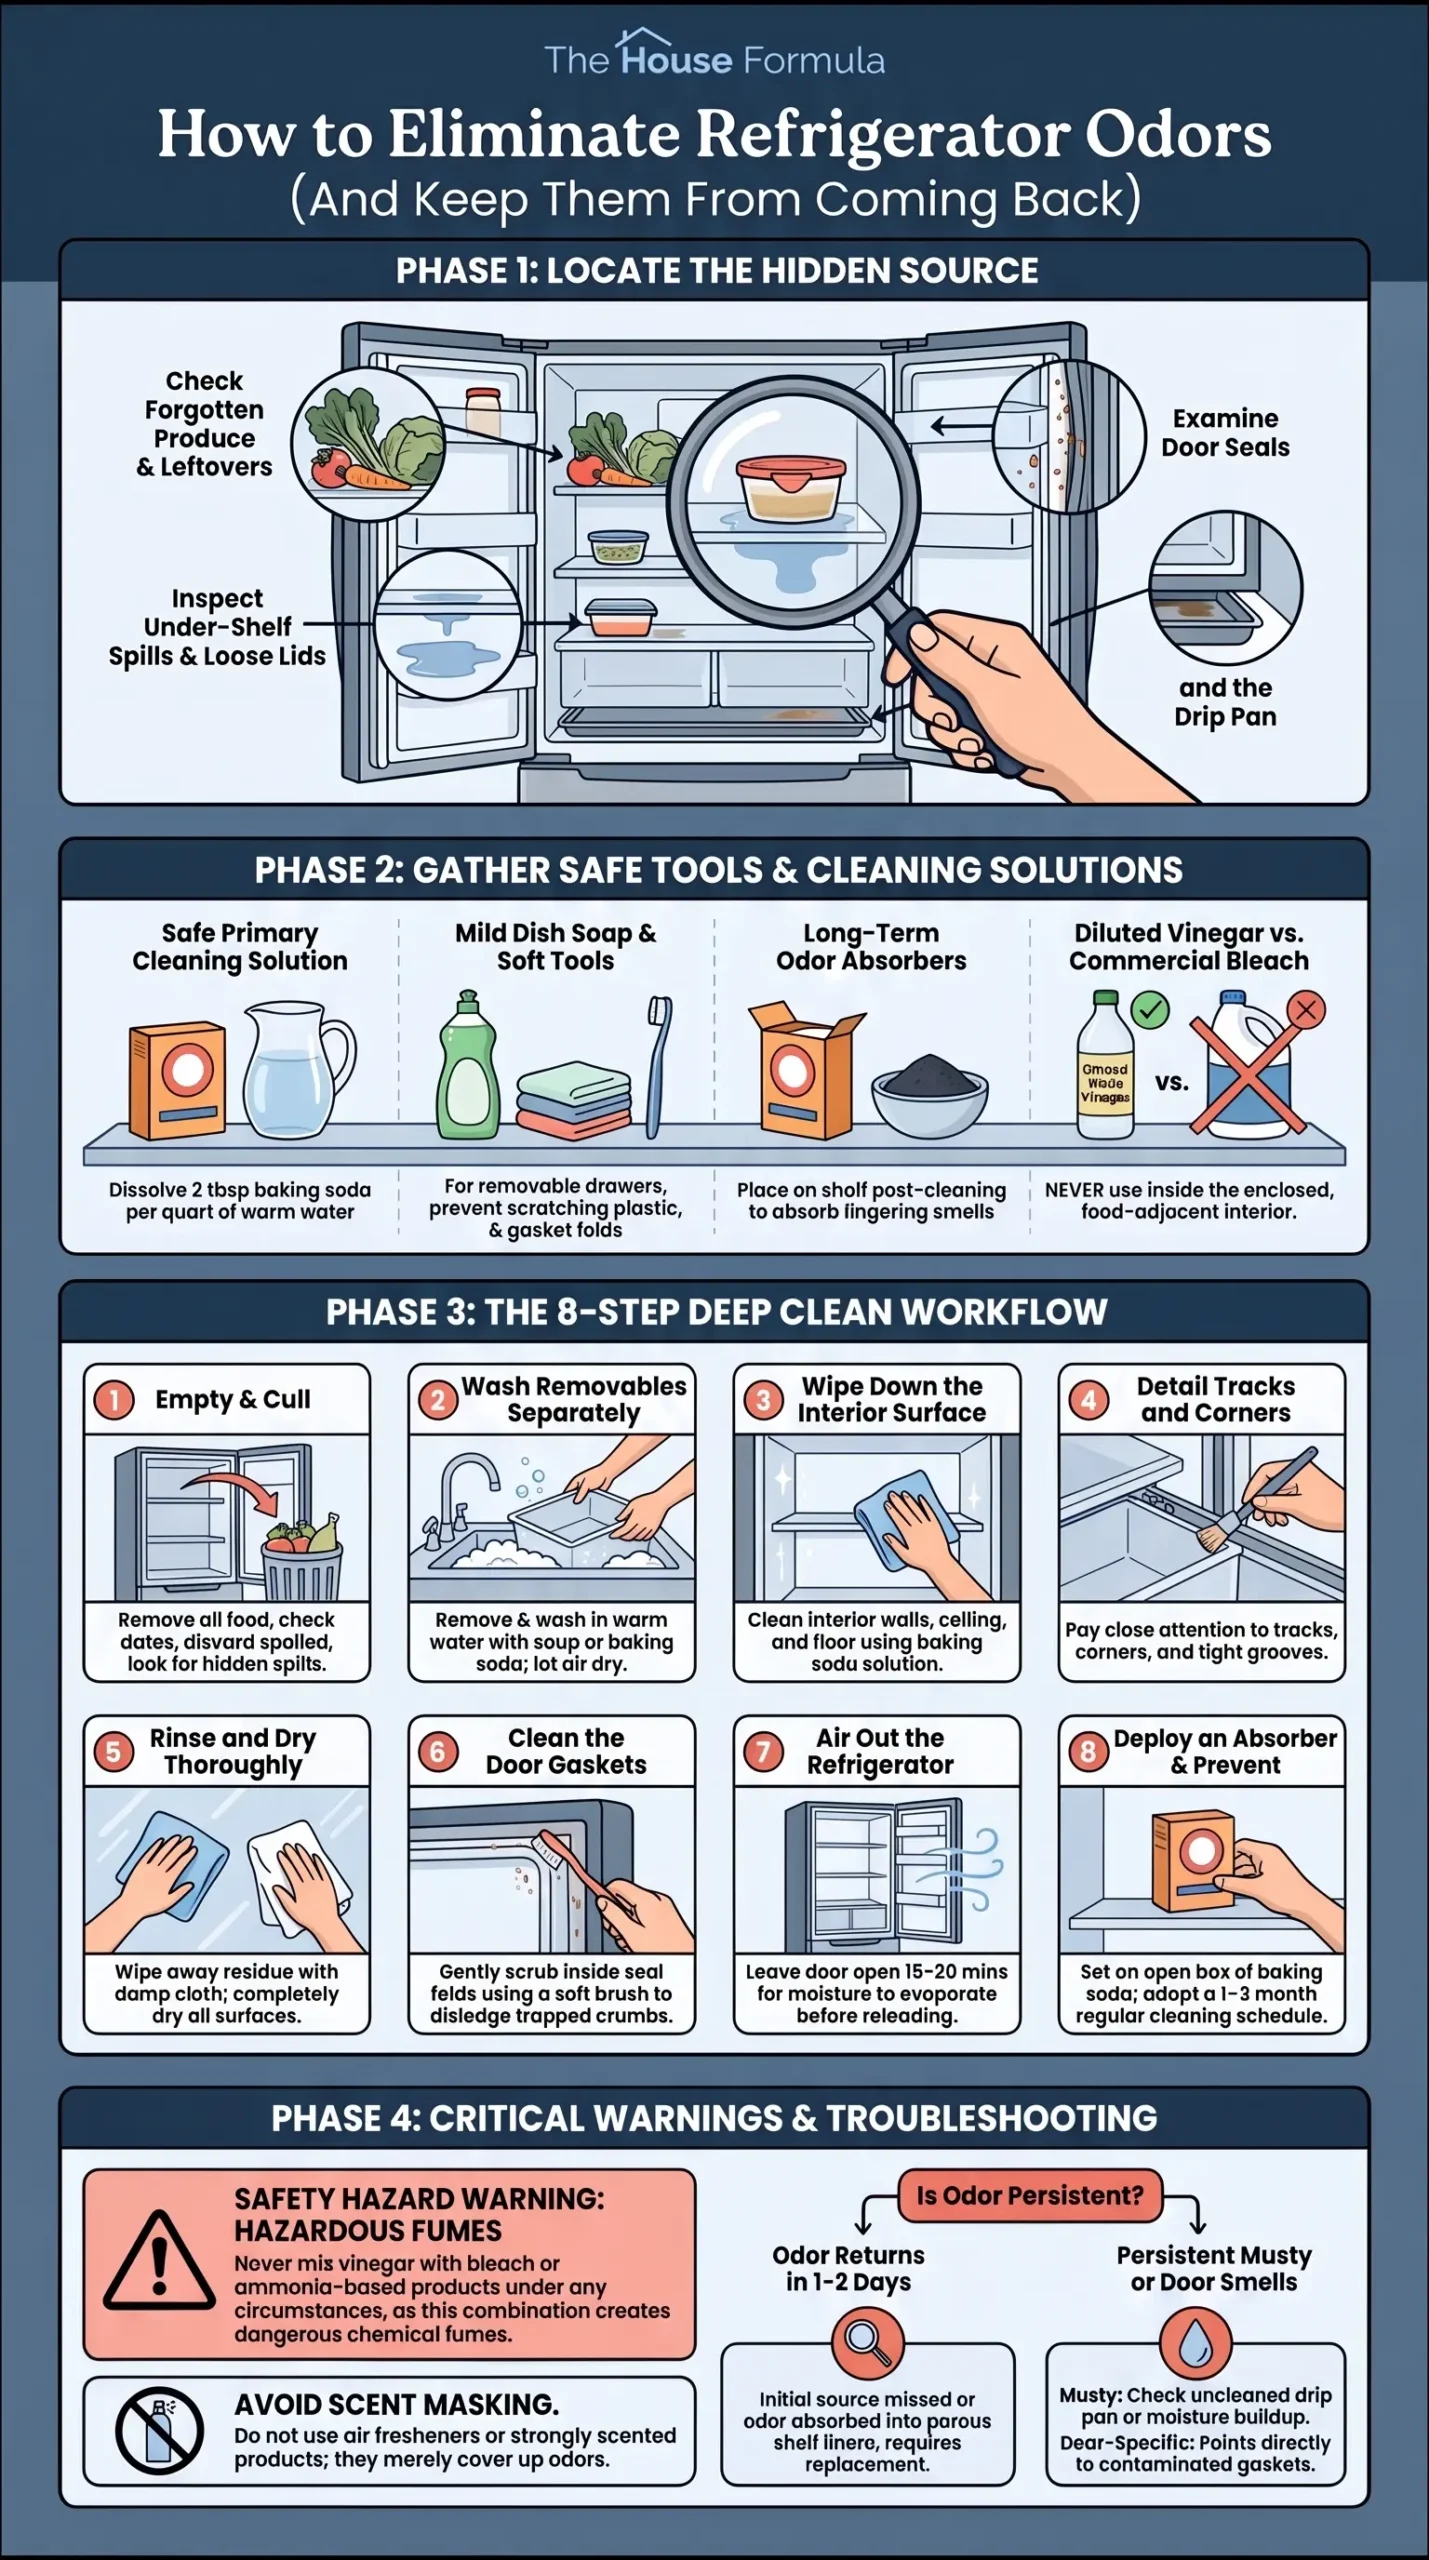
Photo Credit: Hobby Guidebook Editorial
Tools Needed for Removing Refrigerator Odors
A short list of basic tools and ingredients covers nearly every odor situation.
- Baking soda: doubles as a mild cleaning agent when dissolved in water and as a long-term odor absorber when left open on a shelf
- Soft cloths or sponges: for wiping shelves, walls, and drawers without scratching the interior plastic
- Soft-bristle toothbrush: useful for reaching into door seal folds and drawer tracks
- Warm water: the base for nearly every cleaning step in this process
- Activated charcoal (optional): an alternative or supplement to baking soda for ongoing odor absorption, sold in small bags or containers specifically for refrigerator use
- Mild dish soap: helpful for washing removable shelves and drawers, particularly if they have sticky residue beyond just odor
Nothing on this list is expensive or hard to find, and most households already have baking soda and dish soap on hand without needing a special trip to the store.
What Cleaning Products Are Safe for Refrigerator Odors?
Refrigerator interiors sit close to food, so product choice matters more here than on many other kitchen surfaces.
- Baking soda and water: safe, gentle, and effective for both cleaning surfaces and absorbing odor afterward
- Mild dish soap: appropriate for washing removable shelves, drawers, and bins
- Distilled white vinegar (diluted): a reasonable alternative to baking soda for wiping down interior surfaces, particularly effective against mildew-related odor, though it leaves a temporary vinegar smell that fades as the fridge airs out
- Activated charcoal: not a cleaning agent itself, but a passive odor absorber that works well alongside a proper clean rather than as a replacement for one
Avoid bleach inside the refrigerator interior. While diluted bleach is sometimes used on hard, non-porous surfaces elsewhere in the kitchen, it isn't the standard recommendation for refrigerator interiors due to the enclosed space and proximity to food, and it should never be combined with vinegar or ammonia-based products under any circumstances, since that combination produces hazardous fumes.
How to Tell If Refrigerator Odor Needs a Deeper Clean
Some odors resolve with a single wipe-down, while others point to something that needs more attention.
- The smell returns within a day or two of a full clean, suggesting the source wasn't fully found or removed the first time
- A musty or mildew-like smell persists even after the interior is dry and clean, which can point toward the drip pan or a spot with lingering moisture
- The odor seems to come from the door area specifically, which often means the door seals need a closer look rather than the main interior
- A specific food item's smell keeps returning even after replacing it, which may mean the odor has settled into a porous shelf liner or drawer material that needs replacing rather than just cleaning
If none of these apply and the smell is a one-time issue from a specific spill or forgotten item, the standard cleaning process above should resolve it without needing anything further.
Photo Credit: cottonbro studio
What to Avoid When Cleaning Refrigerator Odors
A handful of habits make odor removal less effective or introduce unnecessary risk.
- Using bleach inside the refrigerator interior: not the standard recommendation for this enclosed, food-adjacent space
- Mixing vinegar with bleach or ammonia-based products: this produces hazardous fumes and should never happen regardless of where in the kitchen it's being considered
- Masking odor with air fresheners or strong-scented products instead of finding and cleaning the actual source, which typically just adds a second smell on top of the original problem
- Skipping the drip pan and door seals, since these areas commonly hold onto odor even after the main interior looks and smells clean
- Placing food back in before the interior is fully dry, which can trap moisture and encourage the odor to return sooner
If you notice mold growth rather than just odor, particularly a fuzzy or discolored patch on a shelf or in a drawer, that's a situation where more detailed removal guidance is worth checking, since mold requires a slightly different approach than general odor and food residue.
How Often Should You Clean for Refrigerator Odor Prevention?
Wiping up spills as soon as they happen prevents most odor problems before they start. A full interior clean, following the process above, works well every one to two months for most households, timed alongside a general check of what's stored and what's expired. Pairing this with a consistent routine makes it easier to catch small spills before they turn into a bigger cleaning task. The Refrigerator Cleaning Schedule guide lays out how often each part of the refrigerator, from shelves to the door seals, benefits from attention, which helps odor prevention become part of a regular habit rather than something addressed only after a smell shows up.
When the Whole Interior Needs More Than Odor Control
Sometimes odor is a sign that the entire interior is due for a more complete clean, not just a shelf wipe and a box of baking soda. If it's been several months since the last full interior clean, or if odor keeps returning despite regular spot-cleaning, working through a complete top-to-bottom interior clean addresses more than just the smell. The Refrigerator Interior Cleaning guide covers that full process, including how to handle different shelf materials and what to do about stuck-on spills that a quick wipe doesn't fully remove.
Photo Credit: Internet
For readers dealing with a particularly stubborn or unusual odor situation, additional troubleshooting and household-specific scenarios are covered in Removing Odor from a Refrigerator, which looks at some less common causes and fixes beyond the standard cleaning routine.
Frequently Asked Questions
How do you remove refrigerator odors? Find and remove the source first, wash all removable shelves and drawers, wipe the interior with a baking soda and water solution, dry thoroughly, and place an open box of baking soda or activated charcoal on a shelf to absorb any remaining smell.
How often should you clean a refrigerator to prevent odors? A full interior clean every one to two months works well for most households, along with wiping up spills as soon as they happen rather than letting them sit.
What cleaning products are safe for refrigerator odors? Baking soda and water, mild dish soap, and diluted white vinegar are all safe choices for interior surfaces. Bleach isn't the standard recommendation for the refrigerator interior and should never be mixed with vinegar or ammonia.
What should you avoid when cleaning refrigerator odors? Avoid masking odor with air fresheners instead of finding the source, skipping the drip pan and door seals, and placing food back in before the interior is fully dry.
How can you clean refrigerator odors without damaging it? Stick to mild products like baking soda and dish soap, avoid abrasive scrubbing on plastic shelves and liners, and dry all surfaces thoroughly before placing food back inside.
A Quick Note on Safety
Removing refrigerator odor typically involves mild, low-risk products like baking soda and diluted vinegar, but a couple of precautions are still worth keeping in mind. Never mix bleach with vinegar or ammonia-based products, since this produces hazardous fumes regardless of where the cleaning happens in the kitchen. If odor is paired with visible mold growth, that situation may call for a more specific removal approach than general odor control covers. Work in a space with reasonable airflow if using a stronger commercial cleaner, and always check that any product used near food storage areas is appropriate for that purpose.
For more on keeping the rest of your kitchen clean, explore the complete kitchen cleaning guide.





Leave a Reply