

Crumbs, grease splatter, and the occasional burnt smell are just part of owning a toaster or toaster oven, but letting them build up affects more than just appearance. Trapped crumbs can smoke or even spark inside the heating chamber, while grease residue on the interior walls hardens over time and gets harder to remove the longer it sits. Toaster oven cleaning is a quick task when done regularly, but it does need a slightly different approach depending on whether you're dealing with a simple slot toaster or a full toaster oven with a door, racks, and a crumb tray. This guide is part of the Small Kitchen Appliance Cleaning Guide, and it covers both types, what products are safe to use, and how to avoid scratching the interior along the way.
The Best Way to Clean a Toaster and Toaster Oven
Unplug the appliance and let it cool completely before starting. Remove the crumb tray and empty it, then wash it with warm, soapy water or wipe it out with a damp cloth if it's not removable. Turn a slot toaster upside down over a trash can and gently shake to release trapped crumbs, then wipe the exterior with a damp cloth. For a toaster oven, wipe the interior walls, racks, and door with a cloth dampened in warm, soapy water, using a soft brush for baked-on grease in the corners. Dry all parts fully before plugging the appliance back in.
The sections below walk through the process for each type separately, since a slot toaster and a toaster oven have different designs that call for slightly different handling.
Cleaning a Slot Toaster
A standard two- or four-slot toaster has a simpler interior than a toaster oven, but crumb buildup here is just as common and just as important to address.
- Unplug the toaster before doing anything else, since this is an electrical appliance with exposed heating elements inside.
- Remove the crumb tray, usually located on the bottom or side of the toaster, and empty it into the trash.
- Wash the crumb tray with warm, soapy water, then dry it fully before sliding it back in.
- Turn the toaster upside down over a trash can or sink and gently shake to dislodge crumbs that have collected inside the slots beyond what the tray catches.
- Use a soft brush or a toaster brush, if you have one, to reach into the slots and loosen any stuck crumbs.
- Wipe the exterior with a damp cloth, using a small amount of mild dish soap for any grease spots.
- Dry the exterior fully before plugging the toaster back in.
This whole process takes about 10 minutes and is worth doing weekly, or more often if you use the toaster daily.
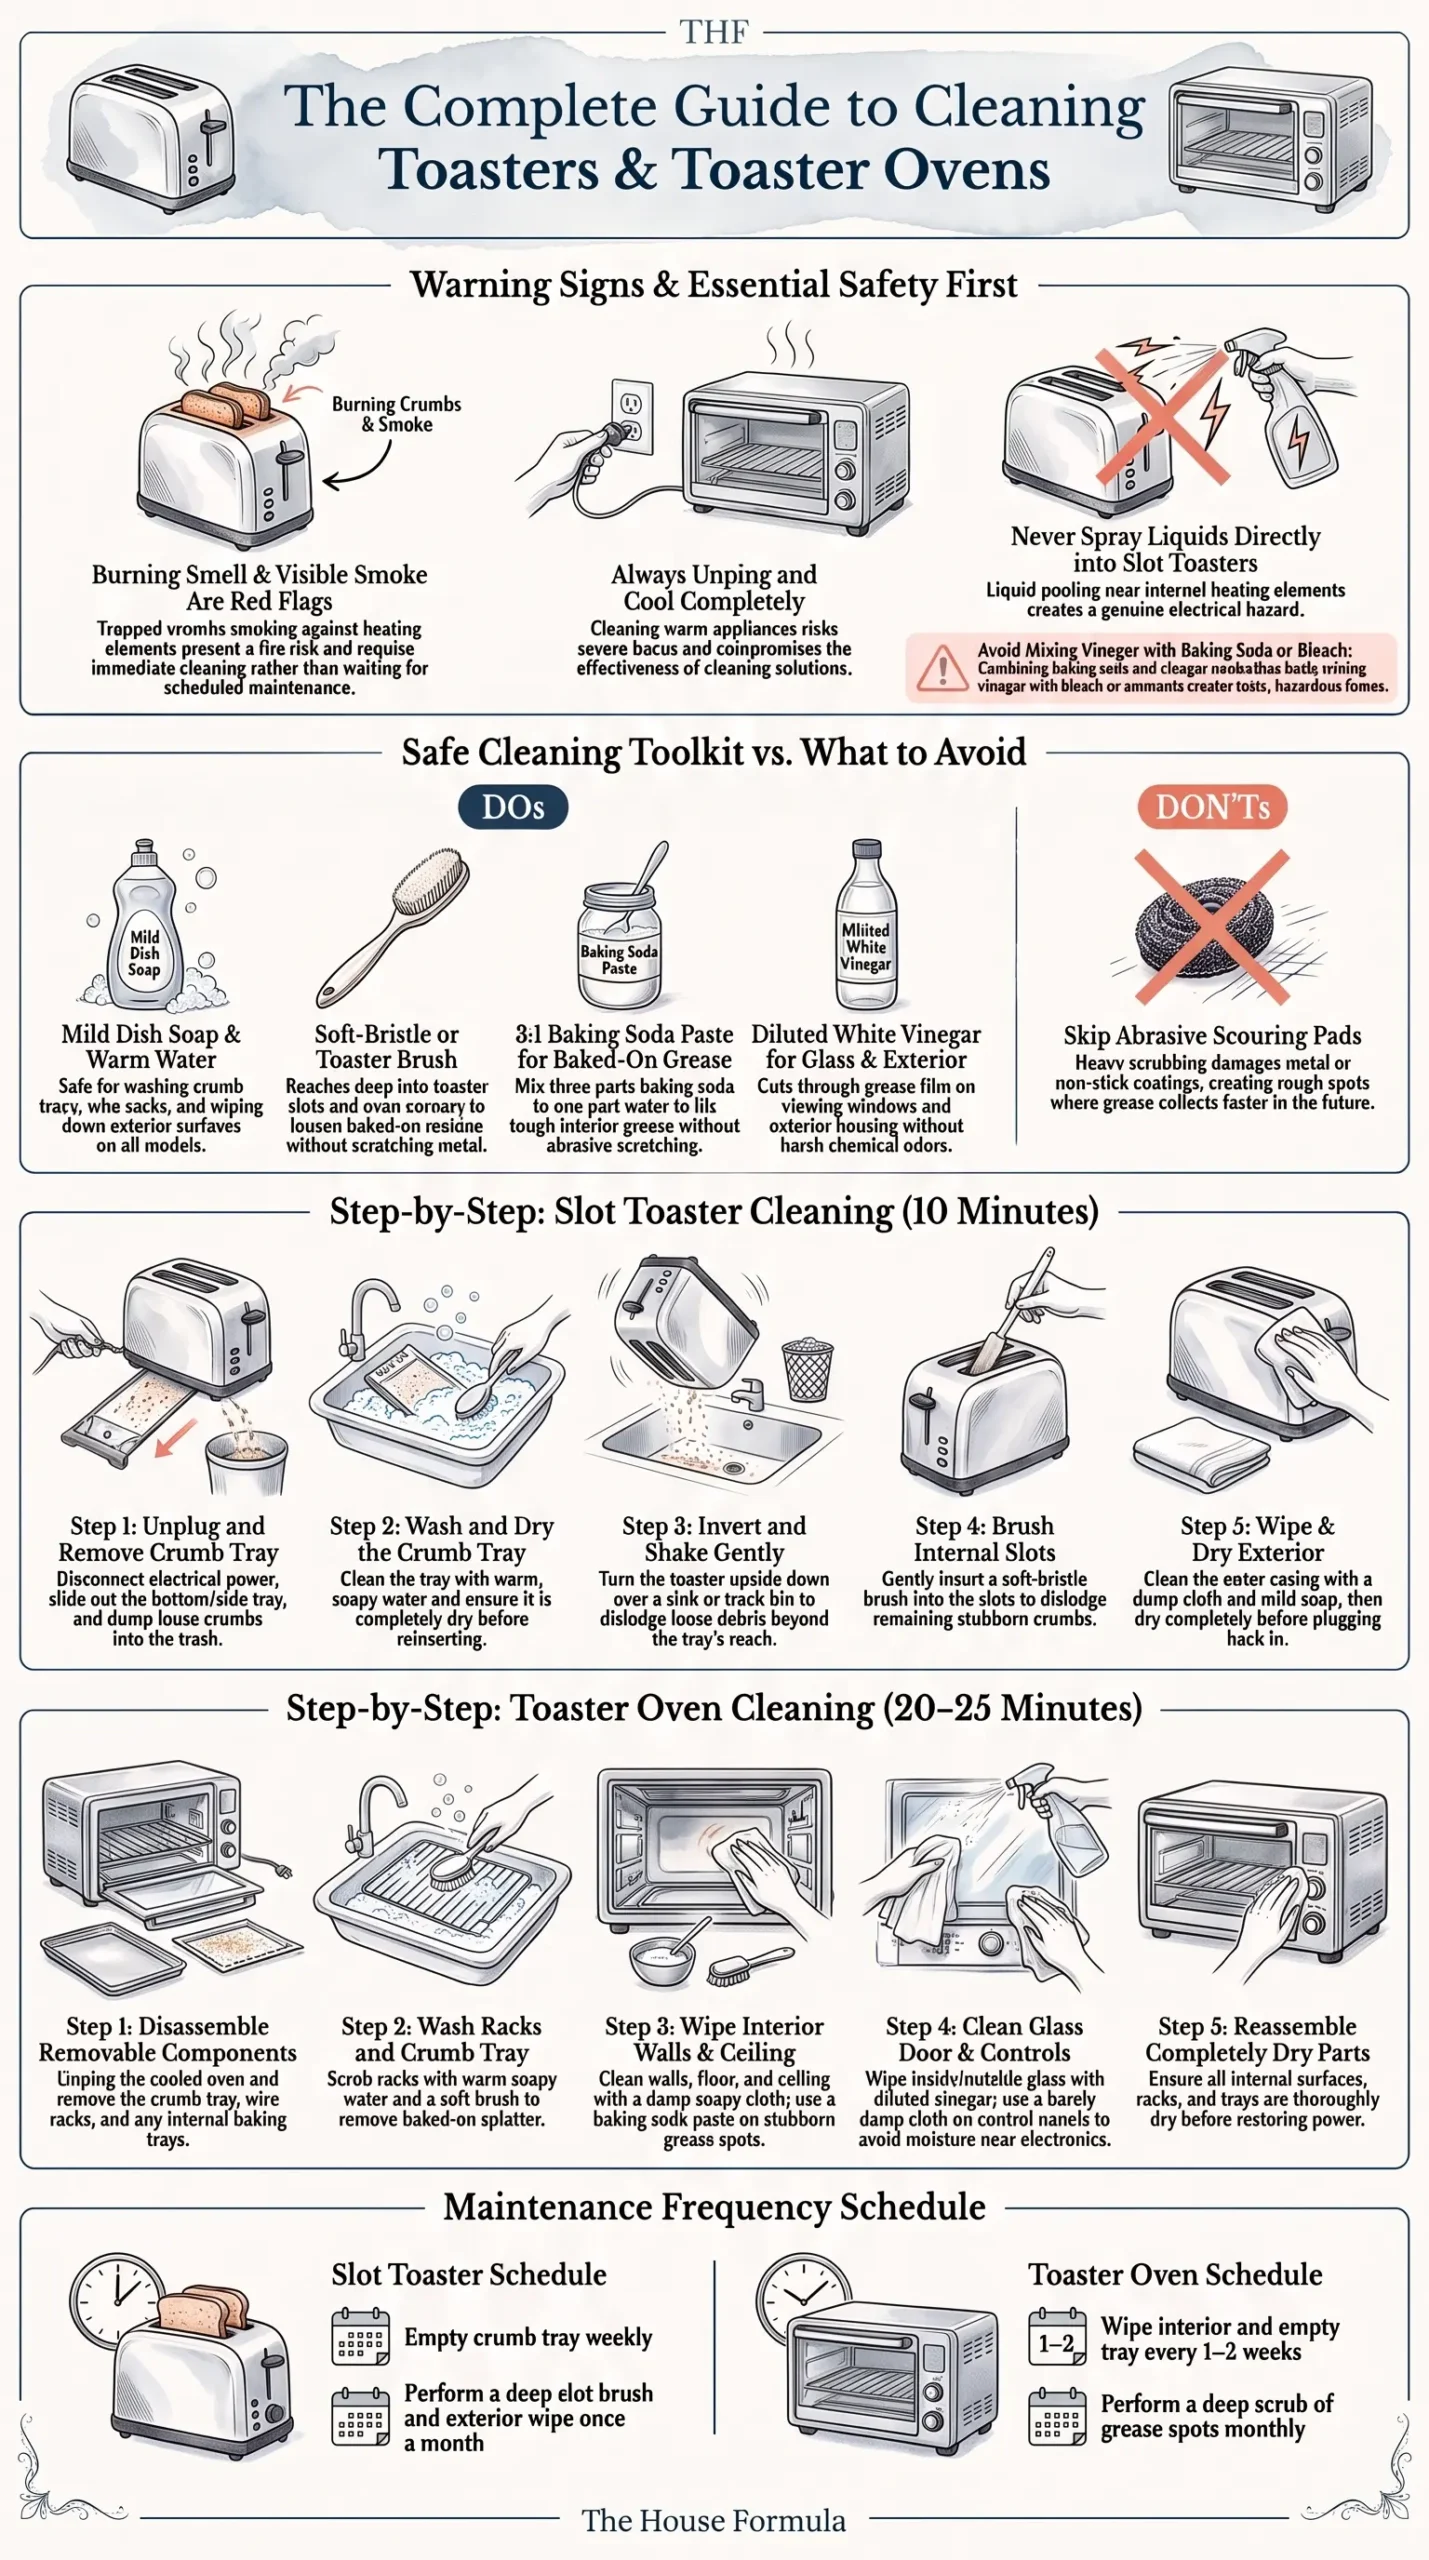
Photo Credit: Hobby Guidebook Editorial
Cleaning a Toaster Oven
A toaster oven has more surface area and more components, so the process takes a bit longer but follows a similar logic.
- Unplug the toaster oven and let it cool completely. Never clean any part of a toaster oven while it's still warm, since this both risks burns and can affect how well the cleaning solution works.
- Remove the crumb tray, racks, and any removable interior parts.
- Wash the crumb tray and racks with warm, soapy water, using a soft brush for any baked-on grease.
- Wipe the interior walls, ceiling, and floor of the oven with a cloth dampened in warm, soapy water.
- Use a soft brush for stubborn grease spots in the corners, working gently rather than scrubbing hard against the metal interior.
- Wipe the door, inside and out, including the glass if your model has a viewing window, using a slightly damp cloth.
- Dry all parts fully, including the interior, before reinstalling the racks and crumb tray.
- Wipe the exterior housing and control panel with a barely damp cloth, avoiding excess moisture near any buttons or dials.
This full process takes about 20 to 25 minutes and works well done every one to two weeks, depending on how often the oven runs.
How to Tell If Your Toaster or Toaster Oven Needs Cleaning
A few signs point to buildup that's overdue for attention.
- Visible crumbs accumulating in the tray or interior beyond what a quick shake or wipe removes
- A burning smell during use, which often points to trapped crumbs smoking against the heating element
- Visible grease film on interior walls of a toaster oven, noticeable as a slightly sticky residue
- Smoke appearing during toasting or baking, a clear sign that crumbs have built up enough to need immediate attention
- A sticky or grimy exterior, particularly around the control panel or door handle
A burning smell or visible smoke during use is worth addressing right away rather than waiting for a scheduled cleaning, since built-up crumbs pose a small fire risk if left unchecked.
What Cleaning Products Are Safe for a Toaster and Toaster Oven?
A short list covers what both appliances typically need.
- Warm water and mild dish soap: effective for the crumb tray, racks, and exterior of both appliance types
- A soft-bristle brush or toaster brush: useful for reaching into slots and corners without scratching the interior
- A microfiber or soft cloth: for wiping surfaces without leaving lint or scratches
- Baking soda paste: helpful for stubborn baked-on grease inside a toaster oven
Avoid abrasive scouring pads on the interior walls or exterior housing, since these can scratch metal or non-stick coatings and create spots where grease collects more easily going forward. Avoid spraying cleaning solution directly into a toaster's slots, since liquid pooling near the heating element is a genuine electrical hazard. Never mix bleach with vinegar or ammonia-based products, since combining them produces hazardous fumes, and this applies to any small appliance cleaning around the kitchen.
Vinegar and Baking Soda for a Toaster and Toaster Oven
Vinegar and baking soda both have a place in this task, though they work best for slightly different problems. A baking soda paste, made from roughly three parts baking soda to one part water, works well on baked-on grease spots inside a toaster oven, since the mild abrasiveness helps lift residue without scratching the metal interior. White vinegar diluted with water makes a reasonable wipe-down solution for the exterior or the glass door, cutting through grease film without leaving a strong chemical smell behind. Keep these as separate applications rather than combining them directly, since mixing vinegar and baking soda together triggers a fizzing reaction that reduces the cleaning effect of both. Avoid using vinegar on any exposed metal heating elements, since repeated acid exposure isn't necessary for this part of the appliance and doesn't offer any real benefit there.
Photo Credit: cottonbro studio
Toaster Oven Cleaning Without Scratching the Surface
The interior of a toaster oven, particularly if it has a non-stick coating on the racks or interior walls, scratches more easily than people expect. A soft cloth or brush handles daily and weekly cleaning well without risking this kind of damage, and it's worth reserving anything more abrasive only for genuinely stubborn spots that don't respond to a normal wipe. For baked-on grease that resists a first pass, letting a damp cloth or a baking soda paste sit on the spot for a few minutes softens the residue before you go back to wipe or scrub, which works better than pressing harder with the same cloth. Testing a new cleaning product on a small, less visible interior spot first is a reasonable precaution if you're using something beyond dish soap and water for the first time on a newer appliance.
Is Professional Cleaning Worth It for a Toaster or Toaster Oven?
Toaster and toaster oven cleaning is a task nearly every household handles at home, and dedicated professional cleaning services for these specific appliances aren't a standard offering the way they might be for larger equipment like ovens or refrigerators. The process described here, done consistently, generally keeps both appliance types functioning well without needing outside help. If a toaster oven's heating element seems to be failing, or if smoke continues even after a thorough interior cleaning, that points to a mechanical or electrical issue rather than a cleaning problem, and is worth addressing through the manufacturer's warranty or a qualified appliance technician instead.
What to Avoid When Cleaning a Toaster or Toaster Oven
A few habits tend to cause more problems than they solve.
- Cleaning either appliance while it's still plugged in or warm: always unplug and let it cool completely first
- Spraying liquid cleaner directly into toaster slots: this risks pooling near the heating element, a genuine electrical hazard
- Using abrasive pads on interior walls or non-stick racks: this scratches surfaces and creates spots where grease collects more easily
- Ignoring a burning smell or visible smoke during use: this points to crumb buildup that needs immediate attention rather than waiting for a scheduled cleaning
- Mixing vinegar and baking soda together directly: this reduces the cleaning effect of both, so use them separately depending on the task
How Often Should You Clean a Toaster or Toaster Oven?
A quick crumb tray empty and exterior wipe works well weekly for a slot toaster used daily, with a deeper cleaning of the slots monthly. A toaster oven benefits from wiping the interior and emptying the crumb tray every one to two weeks, with a deeper scrub of baked-on grease spots monthly or as needed. Households that use either appliance multiple times a day may find a slightly more frequent schedule helpful, while lighter use households can generally stretch these intervals a bit longer.
Related Small Appliance Cleaning
Toasters and toaster ovens aren't the only small kitchen appliances that need regular attention to keep them running well and free of buildup. A blender's blades and gasket trap residue in ways that need their own specific cleaning approach, particularly after blending anything oily or fibrous. The Blender Cleaning guide covers that process in detail, including how to clean around the blade assembly safely.

Photo Credit: Mizuno K
Air fryers have become a common addition to many kitchens, and their basket and heating element collect grease in a way that's somewhat similar to a toaster oven but with its own specific cleaning needs. The Air Fryer Cleaning guide walks through that process, including how often the basket needs washing based on how frequently it's used.
If storage space is tight and your toaster oven sits tucked away between uses, keeping it properly stored between cleanings also affects how much buildup accumulates. The Toaster Oven Storage guide has some practical tips on this that pair well with a regular cleaning routine.
Frequently Asked Questions
What is the best way to clean a toaster and toaster oven? Unplug and let the appliance cool, empty the crumb tray, and wipe the interior and exterior with warm, soapy water. Use a soft brush for stubborn spots and dry everything fully before use.
How often should you clean a toaster and toaster oven? Empty the crumb tray weekly for a toaster and every one to two weeks for a toaster oven, with a deeper cleaning monthly or as needed.
What cleaning products are safe for a toaster and toaster oven? Warm water and mild dish soap, a baking soda paste for baked-on grease, and diluted vinegar for exterior wiping. Avoid abrasive pads and never mix vinegar with bleach or ammonia.
What should you avoid when cleaning a toaster and toaster oven? Avoid cleaning while the appliance is plugged in or warm, spraying liquid into toaster slots, and using abrasive pads on interior surfaces.
How can you clean a toaster and toaster oven without damaging them? Use a soft brush or cloth rather than anything abrasive, let stubborn grease soften before scrubbing, and always unplug and cool the appliance fully before starting.
A Quick Note on Safety
Always unplug a toaster or toaster oven and let it cool completely before cleaning any part of it. Never spray liquid cleaner directly into toaster slots, since pooled liquid near the heating element is an electrical hazard. Never mix vinegar with bleach or ammonia-based products, since this produces hazardous fumes. If smoke or burning smells continue even after a thorough cleaning, that may point to a mechanical issue worth checking with the manufacturer or a qualified appliance technician.
For more on keeping the rest of your kitchen clean, browse the complete kitchen cleaning guide.





Leave a Reply