

A bathroom's air quality depends on more than what's cleaned on the surfaces. Every hot shower sends moisture into the air, and if that moisture doesn't have a way out, it settles on walls, ceilings, and eventually turns into mold. The exhaust fan and vent covers are the parts of the room actually responsible for moving that damp air outside, which makes bathroom ventilation cleaning a different job than wiping down tile or scrubbing a tub.
This guide covers everything you need to know about cleaning bathroom ventilation and air quality, including a bathroom ventilation and air quality cleaning checklist you can run through monthly. If you're not sure where to start, treat this as bathroom ventilation and air quality cleaning for beginners, since most fans and vent covers follow the same basic steps regardless of brand. If you want the full picture of bathroom care first, you can go Back to the complete bathroom cleaning guide.
The Best Way to Clean Bathroom Ventilation
The most effective approach starts with safety, then works from the vent cover inward to the fan housing. Here is the short version:
- Turn off the fan at the switch, and shut off the breaker if you'll be touching wiring or the motor.
- Remove the vent cover according to your fan's design (clips, screws, or spring pressure).
- Wash the cover separately with mild soap and water.
- Vacuum dust from the fan blades and housing with a brush attachment.
- Wipe the housing interior with a lightly damp cloth, avoiding the motor.
- Let everything dry completely before reattaching the cover.
- Restore power and test that the fan runs smoothly.
This order matters because a fan coated in dust doesn't move air as effectively, even if it still sounds like it's running. A clogged vent cover can cut airflow by a meaningful amount before you'd notice anything wrong just by listening to it.
How Often You Should Clean Bathroom Ventilation
Ventilation components collect dust and lint differently than the rest of the bathroom, since they're pulling air (and everything floating in it) through a small opening constantly. A general schedule looks like this:
- Monthly: Wipe the visible vent cover to remove surface dust before it builds into a thicker layer.
- Every 3 to 6 months: Remove the cover and vacuum the fan blades and housing, where dust tends to collect fastest.
- Annually: A closer check of the fan's overall performance, including whether it's still clearing steam effectively after a shower.
Homes with pets tend to need the fan cleaned more often, since pet hair and dander clog vent covers faster than dust alone. Bathrooms used heavily by multiple people also generate more steam overall, which means more moisture cycling through the fan and more opportunity for lint and dust to stick to damp surfaces inside the housing. If your fan sounds noticeably louder or more strained than usual, that's often a sign dust has built up enough to affect the motor's performance, and it's worth checking sooner rather than waiting for the next scheduled clean.
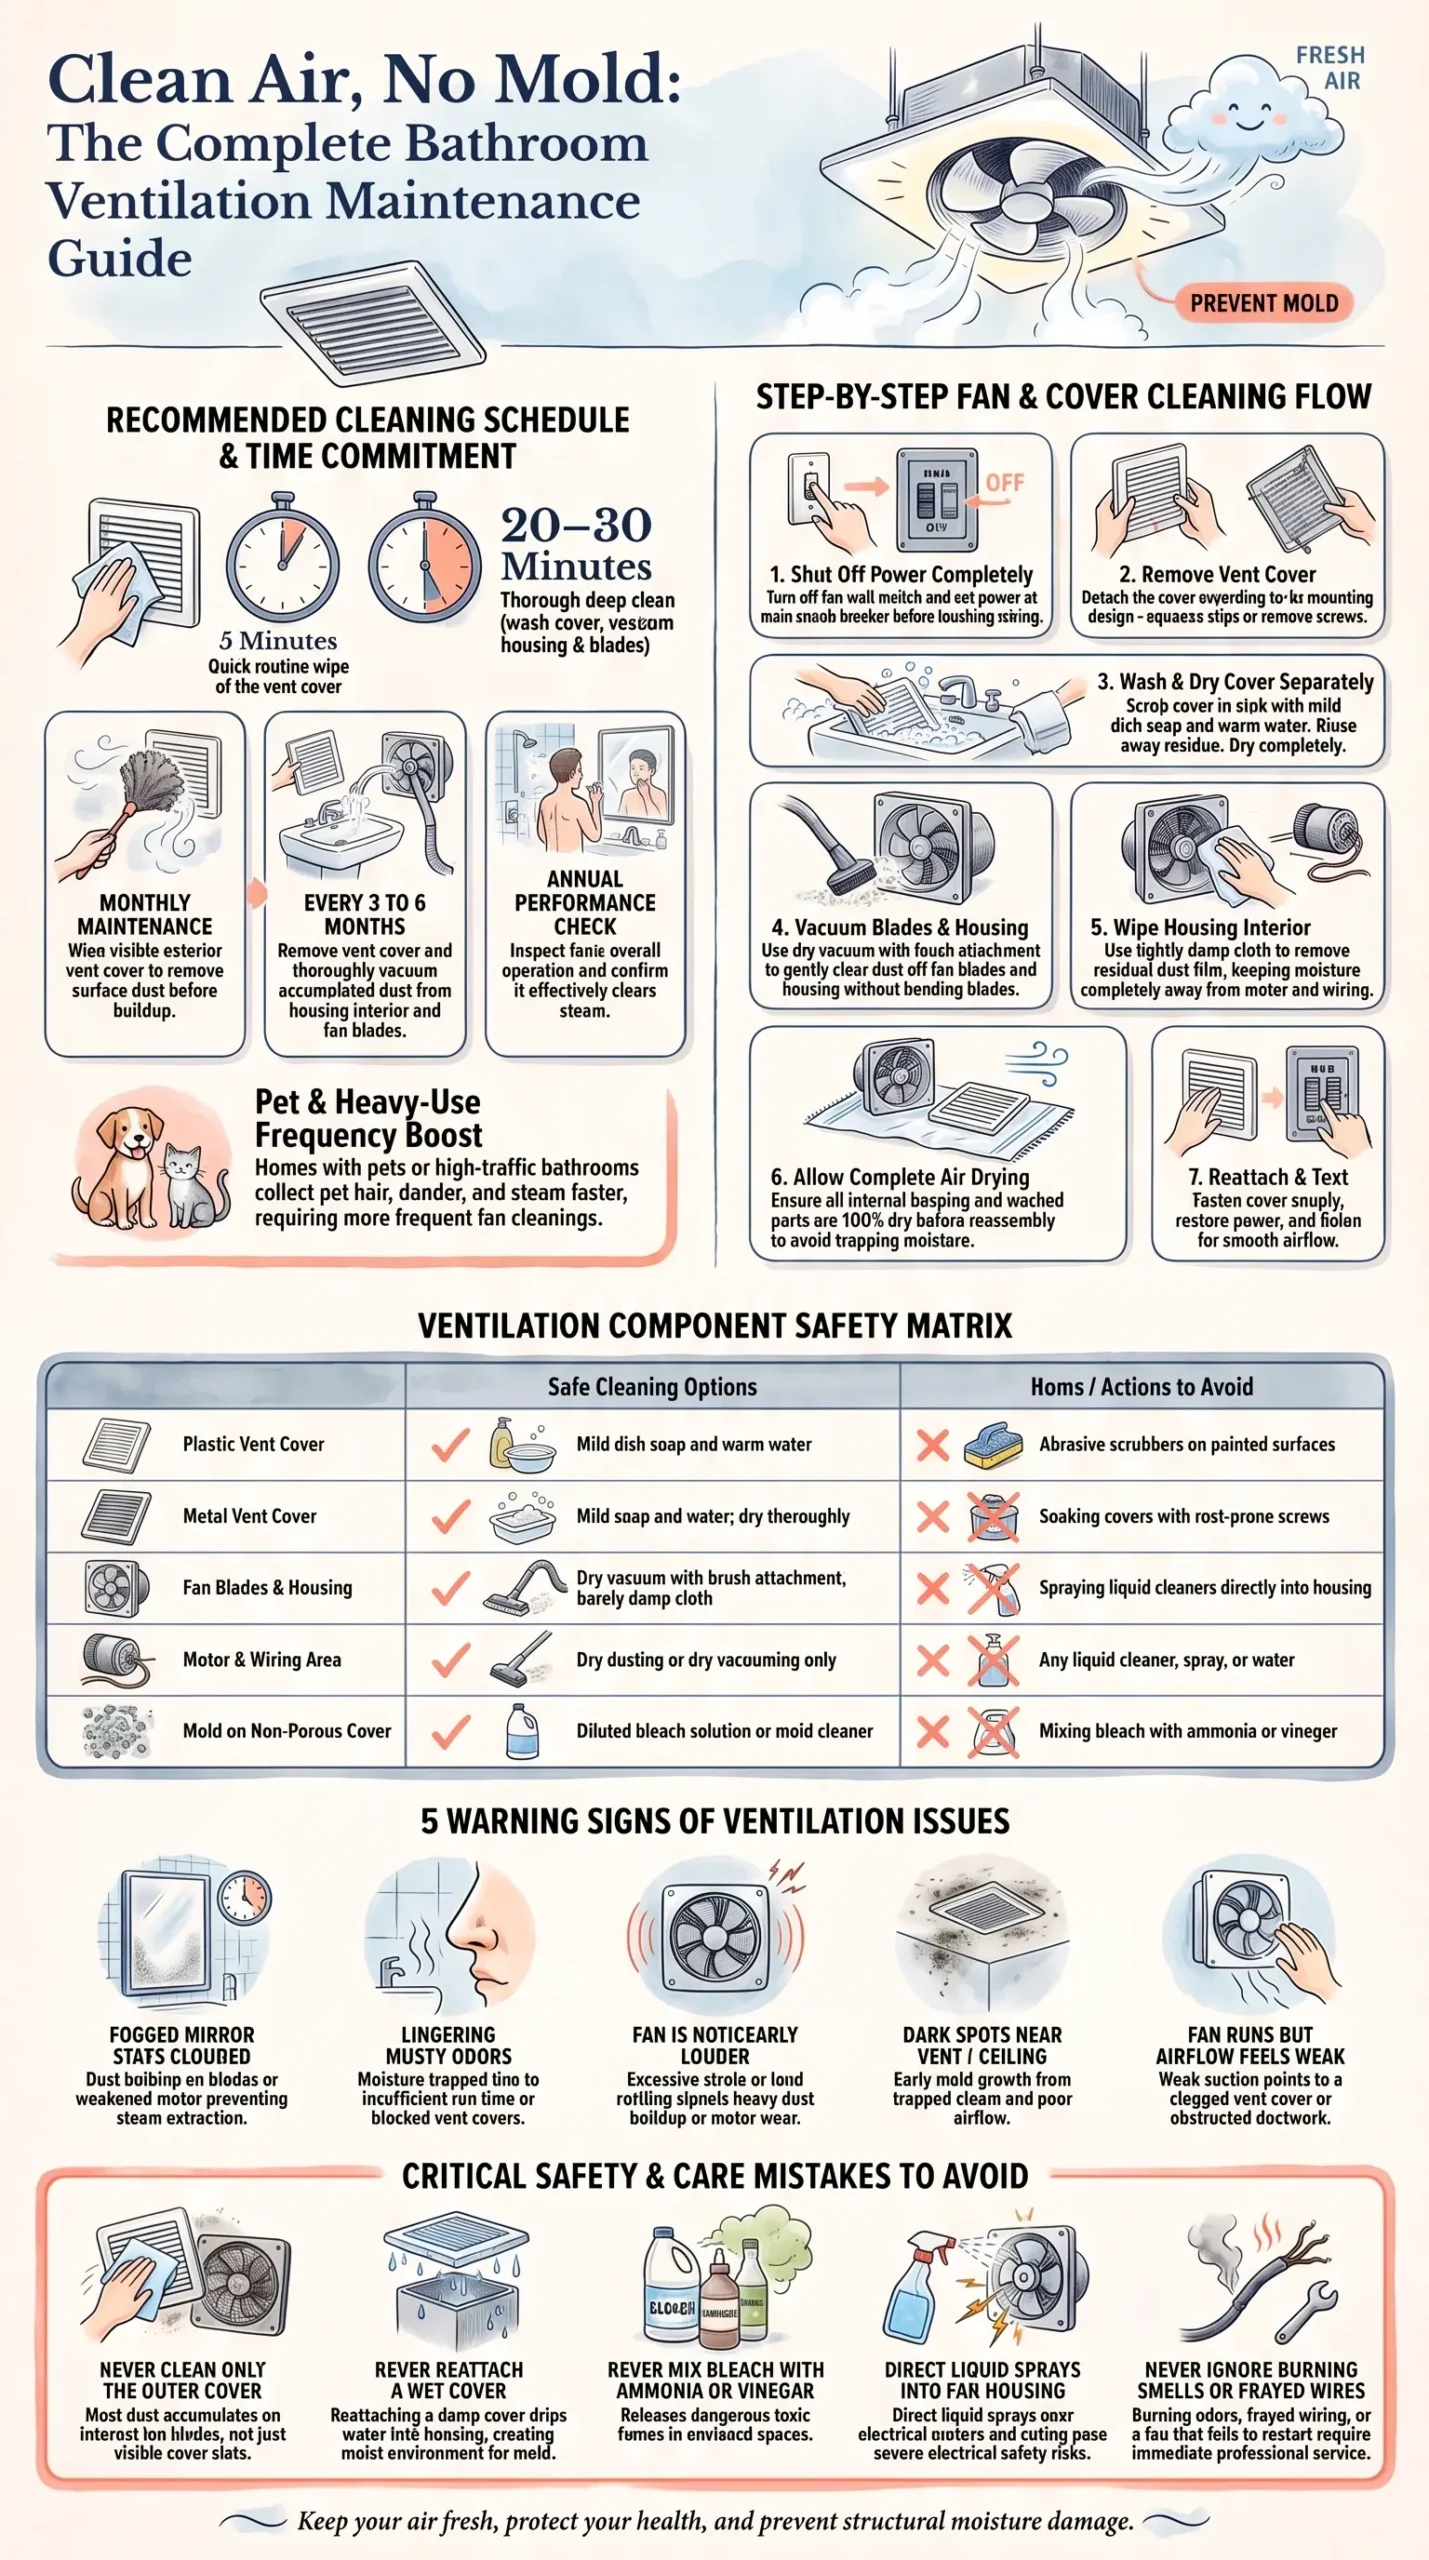
Photo Credit: Hobby Guidebook Editorial
What Products Are Safe for Ventilation Cleaning
Ventilation components mix electrical parts with washable covers, so the right product depends on exactly what part you're cleaning.
|
Component |
Safe Options |
Avoid |
|
Vent cover (plastic) |
Mild dish soap and warm water |
Abrasive scrubbers on painted covers |
|
Vent cover (metal) |
Mild soap and water, dried thoroughly |
Soaking metal covers with rust-prone screws |
|
Fan blades and housing |
Dry vacuum with brush attachment, lightly damp cloth only |
Spraying liquid cleaner directly into housing |
|
Motor and wiring area |
Dry dusting only |
Any liquid cleaner or water |
|
Mold on vent cover or surrounding ceiling |
Diluted bleach solution (non-porous surfaces only) or mold-specific cleaner |
Bleach mixed with ammonia or vinegar |
Important: Water and electrical components don't mix, and the fan motor and wiring are no exception. Never spray liquid cleaner directly into the fan housing or let water drip toward the motor. A dry cloth or a vacuum with a brush attachment is the safer approach for everything except the removable cover, which can be washed separately in a sink.
If you notice mold on the vent cover or on the ceiling immediately around it, a diluted bleach solution can address it on non-porous surfaces like painted metal or sealed plastic, but bleach should never touch unsealed drywall, since it won't fully address mold below the surface. Bleach should also never be mixed with ammonia, vinegar, or other cleaning products, as this combination can release harmful fumes in a small, enclosed bathroom.
Tools That Make the Job Easier
A short list of tools handles most ventilation cleaning tasks:
- A vacuum with a brush attachment, useful for pulling dust off fan blades without scattering it around the room.
- A screwdriver, since some vent covers are held on with screws rather than clips or spring tension.
- A soft cloth for wiping the housing interior and dusting the visible vent cover.
- A step stool, since most bathroom exhaust fans are mounted in the ceiling.
- Rubber gloves, especially useful if you're addressing mold on the vent cover.
Keep a dedicated cloth for ventilation cleaning, separate from cloths used elsewhere in the bathroom. Dust and lint from a vent cover can carry mold spores if there's been any moisture buildup, and reusing that cloth on other surfaces risks spreading them.
Step-by-Step: Cleaning a Bathroom Exhaust Fan
The exhaust fan does the actual work of moving moist air out of the bathroom, so keeping it clear of dust is the single biggest factor in how well it performs.
- Turn off the fan and cut power at the breaker if you plan to touch anything beyond the removable cover. This step matters more than it might seem, since working near a motor and wiring with the power still on carries a real shock risk.
- Remove the vent cover. Most covers either pull down on spring clips or are held with a couple of screws. Check your fan's manual if you're not sure which type you have.
- Vacuum the fan blades and housing interior using a brush attachment, working gently to avoid bending the blades.
- Wipe the housing lightly with a barely damp cloth if there's a film of dust that vacuuming alone doesn't lift, keeping moisture away from the motor and any visible wiring.
- Let the housing dry fully before doing anything else, since reattaching a cover over a damp interior can trap moisture inside.
- Restore power and test the fan. Listen for unusual noise and check that airflow feels stronger than before you started.
- Stop and call a professional if the fan doesn't restart properly or if you notice frayed wiring, burning smells, or other signs of an electrical problem. This goes beyond routine cleaning and needs a qualified electrician or HVAC technician.
A fan that runs but barely moves air, even after cleaning, may be undersized for the bathroom or nearing the end of its working life. For more detail on troubleshooting weak airflow, motor noise, and fan replacement timing, see the full Cleaning a Bathroom Exhaust Fan guide.
Step-by-Step: Cleaning Bathroom Vent Covers
The vent cover is the part most people actually see, and it's also usually the fastest part of ventilation cleaning to complete.
- Turn off the fan before removing the cover, even though this step involves less electrical risk than working on the housing itself.
- Remove the cover carefully, noting how it's attached so you can put it back the same way.
- Wash in a sink with mild dish soap and warm water, using a soft brush to work dust out of the vent slats.
- Rinse thoroughly to remove any soap residue, since leftover soap can attract more dust once the cover is dry.
- Dry completely before reattaching. A cover put back while still wet can drip inside the fan housing.
- Check the fit when reattaching, making sure clips snap fully into place or screws are snug, since a loose cover can rattle or vibrate while the fan runs.
Vent covers with a heavy buildup of dust or pet hair sometimes need a longer soak, and covers with visible mold spots need a different approach than a standard wash. For a closer look at soaking times, mold treatment on covers, and material-specific care, see the Cleaning Bathroom Vent Covers guide.
Photo Credit: Dylann Hendricks
Signs Your Bathroom Ventilation Needs Attention
A few warning signs point to a ventilation problem before mold or damage becomes obvious.
|
Sign |
Likely Cause |
What to Check |
|
Mirror stays fogged long after a shower |
Fan isn't clearing steam effectively |
Dust buildup on blades, weak motor |
|
Musty smell that lingers |
Moisture sitting in the room too long |
Fan run time, vent cover blockage |
|
Fan is noticeably louder than usual |
Dust buildup or motor strain |
Clean blades and housing, check for wear |
|
Dark spots near the vent cover or ceiling |
Early mold growth from trapped moisture |
Vent cover cleanliness, overall airflow |
|
Fan runs but airflow feels weak |
Clogged vent cover or blocked ductwork |
Cover cleanliness, duct condition |
If a musty smell or dark spots persist even after cleaning the fan and cover thoroughly, the issue may be in the ductwork itself, which usually calls for a professional inspection rather than continued at-home cleaning.
What to Avoid When Cleaning Bathroom Ventilation
A few habits create more risk than benefit, particularly given the electrical components involved.
- Avoid working on the fan with the power still on, especially if you're touching anything beyond the removable cover.
- Avoid spraying liquid cleaner directly into the fan housing, since moisture near the motor and wiring is a genuine safety concern.
- Avoid mixing bleach with ammonia or vinegar when treating mold on a vent cover, as this combination can release harmful fumes.
- Avoid using bleach on unsealed drywall or porous ceiling material around the vent, since it won't fully address mold below the surface.
- Avoid ignoring unusual fan noise or smells, since these can point to an electrical issue that cleaning alone won't fix.
How to Clean Ventilation Without Damaging It
A few habits protect the fan and its components long term:
- Always cut power before doing anything beyond wiping the visible cover.
- Use dry tools (vacuum, dry cloth) for the fan housing and motor area, and save water for the removable cover only.
- Let all parts dry fully before reassembling.
- Check that the cover is seated correctly when reattaching, since a loose fit can cause rattling or reduced airflow.
- Address any mold, unusual noise, or weak airflow early, since these problems tend to worsen the longer they're left unaddressed.
Manufacturer instructions for your specific fan model take priority over general guidance, since designs vary in how covers detach and how much of the housing is safe to access without professional help.
Common Mistakes to Avoid
Even careful homeowners fall into a few repeat mistakes:
- Cleaning the vent cover but never touching the fan itself. Most of the dust that actually blocks airflow builds up on the blades, not the visible cover.
- Leaving the fan off entirely during and after showers. Skipping fan use, even briefly, lets more moisture settle on walls and ceilings than the fan can later clear.
- Reattaching a wet cover. This can drip moisture into the housing and create the exact damp conditions that lead to mold.
- Ignoring a noisier-than-usual fan. This is often an early sign of dust buildup or motor strain, both of which are easier to address before they get worse.
- Skipping the breaker step. Working near a motor and wiring without cutting power is an unnecessary risk that a few extra seconds avoids entirely.
Photo Credit: David Underland
How Long a Full Ventilation Clean Takes
A routine wipe of the visible vent cover takes about 5 minutes. A full clean, including removing the cover, washing it, and vacuuming the fan housing, typically takes 20 to 30 minutes for an average bathroom fan. Fans that haven't been cleaned in over a year, or covers with heavy pet hair buildup, may need extra time for a thorough first pass.
Bathroom Ventilation and Air Quality Cleaning Checklist
Use this quick checklist for a routine ventilation clean:
- Turn off the fan and cut power at the breaker if working beyond the cover.
- Remove the vent cover.
- Wash the cover with mild soap and water, then dry completely.
- Vacuum fan blades and housing with a brush attachment.
- Wipe the housing lightly if needed, keeping water away from the motor.
- Let all parts dry fully before reassembling.
- Reattach the cover securely.
- Restore power and test that the fan runs smoothly.
Frequently Asked Questions
What is the best way to clean bathroom ventilation and air quality? Turn off the fan and power, remove and wash the vent cover separately, vacuum dust from the fan blades and housing, let everything dry, then reassemble and test the fan.
How often should you clean bathroom ventilation and air quality? Wipe the visible vent cover monthly, vacuum the fan blades and housing every 3 to 6 months, and check overall fan performance annually.
What cleaning products are safe for bathroom ventilation and air quality? Mild soap and water works for the removable cover. The fan housing and motor should only be dusted or vacuumed dry, never sprayed with liquid cleaner.
What should you avoid when cleaning bathroom ventilation and air quality? Avoid working on the fan with power still on, avoid spraying liquid into the housing, and avoid mixing bleach with ammonia or vinegar on moldy covers.
How can you clean bathroom ventilation and air quality without damaging them? Cut power before accessing the housing, keep water limited to the removable cover, let all parts dry fully, and reattach the cover securely.
What common mistakes should you avoid with bathroom ventilation and air quality? Cleaning only the cover and skipping the fan itself, reattaching a wet cover, ignoring unusual fan noise, and skipping the breaker step before deeper cleaning.
For the full room-by-room approach to bathroom care, Back to the complete bathroom cleaning guide.
A Quick Note on Safety
Cleaning bathroom ventilation involves working near electrical components, so a few precautions matter. Always turn off the fan at the switch, and cut power at the breaker before touching anything beyond the removable vent cover. Keep water and liquid cleaners away from the motor and wiring at all times. If you're treating mold on a vent cover with a diluted bleach solution, never mix it with ammonia, vinegar, or other cleaning products, and make sure the bathroom is well ventilated during the process. If your fan shows signs of an electrical problem, such as burning smells or frayed wiring, or if mold keeps returning despite regular cleaning, it's best to have a qualified electrician or HVAC professional take a look.


Leave a Reply